Showing posts with label other periods.. Show all posts

Wednesday, May 27, 2020

Love in the Time of Coronavirus, Part 2

If you read the previous post, you saw the 1938 Gran Prix cars that are one of my unfinished projects.  I think that's one of the fun things about a post like this; you get to see some things that normally probably wouldn't be shown on this blog, given my focus on naval stuff.  I can even hear you asking, "what OTHER kinds of minis does he have that he hasn't shown us?"  Well, there's WWII, American Civil War, mobsters. . . Oh wait, you say you didn't ask that?  Bummer. 😞  Well, for the purposes of this post, I'm going to just pretend that you did ask.

My friends who game with me regularly already know my opinion of air power in naval games.  I think aircraft are sneaky, underhanded contraptions that are barely one step above submarines in terms of ruining a good naval fight.  Zeppelins fall into the same category, so don't think the lighter-than-air people get away either.  In short, if it moves under the sea or flies over it, I'm not a fan.

Now, airplanes fighting airplanes?  That's cool, and even more if they're jet powered.  That's probably why I've got a few sets of rules, and a box of airplanes to play with.  The set of rules I use is the one that is most popular in my area.  To wit:
They give a fun game, are easy to teach and give reasonable results.  Using these rules, I've played everything from Sabres over Korea (and other places) to "MiG-28's" from the original Top Gun. I've also played the WWII version, but the faster planes are more fun to me.

So what types of air wars do I like to play?  Well, there are a couple of periods with another in the planning stages.  As an American, I can't ignore the big dog in the room, which is Vietnam.  I've managed to mostly resist the obvious temptation to buy USAF and USN aircraft, restricting myself to USAF.  It's an interesting period because most of the Vietnamese aircraft in scenarios are MiG-17's, with an occasional MiG-21 or 19.  MiG-17's are fun to "fly."  They are quick, and maneuverable enough to run rings around any US aircraft.  Their biggest disadvantage is that they don't have any of these:


the robotic flying boomstick of DEATH, aka the Sidewinder missile.  It seems that my destiny as a Red pilot is to get hammered by one of these 🀬every time we play.  The funny thing is, they are actually pretty unreliable in game terms.  Still, they get me more often than not.  I didn't post any pictures of the Vietnam aircraft, because they were some of the first ones I ever painted.  I'm no longer happy with how they look, since they're what taught me I'm no good at using washes.

Since missiles seem to be my nemesis, the best thing to do is step back to a period where there aren't any, or not very many.  No, not Korea, as those planes aren't fast enough.  For real fun, you gotta try these:

"Oh, I recognize those.  They're, . . . wait, whut?"
Those are planes for the Indian-Pakistan War of 1965.  While the ground war ended up being a bit of a stalemate, the air war was not.  The general consensus was that in this round of the ongoing Kashmir crisis, the Pakistani Air Force (PAF) was the winner.

As a game, the air war has a lot going for it.  It's short, only about three weeks.  The Indian Air Force (IAF) is flying a grab bag of British, French, and Soviet equipment, but the PAF is flying American aircraft exclusively.  The aircraft themselves range from outmatched WWII gear:

deHavilland Vampire.  First flight: 1943
Miniatures by MSD Games, flight stand by Fight's On! (https://www.fightsonstore.com/)


To evenly matched dogfighting rivals:

F-86 Sabre and Hawker Hunter. Both minis by I-94 Enterprises
(main site: https://i-94enterprises.com/ store: https://raiden.25.ekm.shop/ )


To the limits of 1950's technology.

F-104 Starfighter and MiG-21 F-13.  Both by I-94 Enterprises.
There's not just fighters, of course.  Bombers and attack planes play their part as well:

English Electric Canberra and Dassault Mystere IV
Canberra by ??? and Mystere by I-94.

There are still more planes, but this is already getting to be a long post.  So how did I find out about this offbeat conflict?  As with so many other things, I read a couple of books:


I'm not saying which one I read first. 😎

Back in part 1 of this post, I promised you that I would tell you about a new project that somehow tied in a little closer to what I normally do.  So how does all the above stuff about airplanes tie into that?  Well, that will take a couple of more photos.  Let's look at some stuff on the painting table, shall we?


Now where could they be going?

Well, those are some good-looking ships, even if one isn't quite finished!  Pretty much the epitome of the Cold War Royal Navy.  Got to be a project set in the 1980's then.  World War III at sea, maybe?


Geez, more 1:1200/1250 aircraft carriers.  The one on the left has a ski jump and no angled deck, so clearly not US Navy.  The right hand one doesn't quite look American, but not British either.  With so many modern(ish) aircraft carriers around, there's got to be some airplanes. . . 

Oh, hello!
Well I would guess that is a naval airplane, given the anchors painted on the wings.  Maybe he can fly by again, so that we can get a better look at his markings. . .
OK, thanks.
Obviously, I'm going to start doing some of the air attacks during the Falklands War in 1982.  It gives a chance to run a small campaign using both naval and air forces.  Yes, the ships will be stationary targets, but they still need to look good!  Besides, they can shoot back with their anti-aircraft defenses like guns and missiles.  I really love Check Your 6 Jet Age, and so this project should be a lot of fun.

In closing, there is one company listed here that I would like to give a little more of a shout out to.  That company is Fight's On!, and their website is: https://www.fightsonstore.com/ .  They make terrain and accessories for air games.  Their best-known product, other than missiles are the "Cadillac of the Sky" flight stands that you saw in the pictures above.  The stands can track movement and altitude by using magnetic rods of differing lengths.  It sounds complicated, but is really not.  For some photos of them in action take a look at: https://www.fightsonstore.com/product-page/cadillac-of-the-sky-flight-stands .  Full disclosure: The owners of the company are gaming buddies of mine.  You can tell them I sent you, but I don't think it will get you a discount.😁  

Friday, July 12, 2019

There's a protest singer singing a protest song , , , ,

Well it's taken a while, but I'm finally making some progress on the "Save the Whale!" game.  You might recall that I mentioned this one in my post entitled "A Long Spell in Drydock." If you want to refresh your memory, here's the link: https://mymodelsailingships.blogspot.com/2019/06/back-in-saddle-again.html .

I had to find some decal paper, as none of the craft stores in our area carry it any more.  So, after finding some, I printed up  my decals for the Greenpeace ships.  The one for Solo came out looking really well, and it's amazing how much of a difference it made.

The original


My model, before decals. . . 


and after.
Even I'm surprised at how much of a difference the decal made.  Now, the ship really looks finished.  Encouraged by this, I went to put the white logo on the side of Rainbow Warrior.  At this point I realized my mistake; I had bought clear decal paper, not white.  While that worked just fine on Solo, it obviously was not going to work on the other ship.  Rather than make the same mistake twice, I ordered some white paper online, and waited for it to arrive.

While Decapod's model of Rainbow Warrior on Shapeways is pretty good, I decided to modify it to more closely match the photos of the real ship.  Specifically, this photo:


After looking at this and some other pictures of the ship, I started modifying the model.  I took everything off the ship behind the superstructure.  Then, I installed a foremast and mainmast made out of .020 music wire.  This should make them resistant to breakage, and encourage gamers to be careful with them.  I made some changes to the forward deck area based on other photos not shown here, and put boats on her by using some of my GHQ small boats from sailing ships that I cut to the right length.  Finally, I used some small plastic rod to put the two square green items on the top of the wheelhouse.  Unfortunately, I didn't take any pictures during the modification, but the ship went from this:


to this:


Not too bad, but she will look even better once the lettering is on the side.  It turns out that I didn't get the green of the logo to be an exact match for the hull color, but I realized at the beginning it wouldn't be perfect.


The white line below the letters is where I was not quite able to reach in with a brush and touch the edge of the decal up with green paint.  I think, though, that when I put the wake effects onto the base that will be covered.  Honestly, I'm not quite as happy about these as I was with ones for Solo.  It's still better than not having it, and it doesn't look quite as bad to the naked eye as it does here.

Of course, you can't have Greenpeace ships without the rubber boats to go with them.  As I mentioned in the earlier post, I had found some Zodiac boats on Shapeways that looked like this:


Well, they paint up pretty quickly.  The 4 I did took maybe 45 minutes tops. 


In looking at pictures of Greenpeace rubber boats (technically Rigid Inflatable Boats, or RIBs) there doesn't seem to be a standardized color scheme.  These four represent what seem to be the most common colors.  Although the black boat seems to look smaller than the others, they are all the same model.  I thought that was an interesting optical illusion.

And with that, the protest forces for my "Save the Whale!" game are done.  I guess the only question left is, "What's up with the title for this post?"  When I started the blog, I was stuck for a name, and my wife came up with what I'm using now.  Since I'm old enough to remember when "Come Sail Away" was a huge hit for the band Styx, I thought it would be funny if the post titles used lines from songs, or were a play on the lyrics.  So, I'm starting to do that with this one.  No prize for guessing who the artist and song are, because Google makes it too easy to find anything nowadays. 

Saturday, January 26, 2019

The Descendants

I've been terribly dilatory about posting something this month.  There's a few reasons, and some of them I think are fairly reasonable.  For openers, I've finally decided to really start taking care of myself like my doctor said to do almost a year ago.  Consequently, I'm walking for an hour a day either 5 or 6 days a week.  It's not the 7 days a week he wanted, but it's better than what I was doing.

I've also started a new hobby that takes up a bit of time.  About a year ago, I started taking fencing lessons.  I did it in college, and then didn't for 30+ years.  Well, much to my surprise the city here teaches it as an adult fitness course so I took it up again.   As I've taken more lessons, I've started fencing with a couple of different groups.  Along with this, my wife retired after 26+ years with the city and we've been enjoying doing things together.  All the above, combined with a bit of general laziness this New Year, has kept me from updating as much as I've wanted.  With this post though, we should get 2019 started off on the right foot.

The plan is to play the first Cod War game in March, so that is what I've been painting so far this year.  I've gotten another sidewinder trawler painted, along with a couple of Icelandic Coast Guard (ICG) vessels painted.  I'll put pictures of those up later, but honestly, they're not very interesting as the ICG vessels are just shades of gray.  What has me really excited is the chance to paint up some Royal Navy vessels.

The first vessels here are a pair of Type 12M Rothesay class frigates.  Honestly, I bought them from Shapeways thinking they were Type 12I Leander class vessels but I was wrong.  To make things worse, I didn't realize this until I had shortened the mainmast to put the distinctive Leander class radar antenna on them.  After kicking myself for my mistake, I decided to go ahead and put the antennae on the ships, thereby turning them into a sort of generic Royal Navy frigate.  The Rothesay class ships also served during the Cod Wars, so I'm not really out of bounds by using them.

To me, these ships are direct descendants of my British sailing ships (hence the title of this post).  That's one reason I'm excited about painting them, but the other reason is that they carry a really snazzy paint job.  Light gray hull and superstructures, dark green decks and a dark gray helicopter landing area with white markings make for a very distinctive looking ship.  You can see for yourself in the photos below:
HMS Plymouth (F126) and HMS Falmouth (F113).

HMS Plymouth

HMS Falmouth
Clearly, one of these ships isn't quite finished yet.  Plymouth needs to have the base detailed, and some final little bits done to her.  I added the radar antenna (that large dark colored block on top of the mainmast) and the extension on top of the foremast for both ships.  The foremast extension was done with .20 wire, so as to keep people from brushing against it; the Smooth Fine Detail plastic used by Shapeways is good at capturing detail but a little bit fragile.  Hopefully this will keep players from using the foremast to move the ships.  There were several whip antennae along the deck of these ships, but I haven't decided whether or not to add those.  If I do, it should be easy to use some brush bristles cut to length.

Sharp-eyed observers may note that the hull of Falmouth looks a bit rougher than the one on Plymouth.  This is partially due to some paint problems I had on Falmouth and partially due to the way the hulls on these ships are printed.  All three of these ships have some heavy striations due to the various angles on the hull.  I'm not sure why there weren't as visible on Plymouth, but I am presuming that the way I prepped the second hull might have helped hide them.  Problem is, I'm not sure what I did!

These aren't the only Royal Navy ships for this period I've got, and I will post the others as I get them done.  In closing though, I would be seriously remiss if I didn't admit that part of the reason for this post are my two virtual shipmates: Stew and Vol.  By making some posts on their blogs this month, they kind of shamed me into doing the same. 😬  Thanks guys, and things should be back on track now!

Tuesday, November 20, 2018

Cod Wars? Yes, Because . . .


I'm of the opinion that anything which floats can be made into a good game.  For that reason, if you put on a game that has ships of some sort then chances are I'm going to enjoy it.  Due to this, I've played with everything from sailing ships to World War II battleships.  I haven't played any ancient naval (but want to try it), and I've even played Greenpeace protesters in a "Save the Whale" game.  So, I don't mind trying out an oddball game.  Keep that in mind as you read this.

One of the regular members of our gaming group likes to ram things when we play naval games.  He's at his happiest when he can bang into other ships on the table.  Preferably, the rammed ships are his opponents but I'm not sure that's completely necessary.  This has actually become a bit of a running joke among the group.  Unfortunately for him, ramming things with a sailing ship is really bad for the ship where rigging and the bowsprit are concerned.  Because of this, I've been on the lookout for rules other than ancients where ramming is actually a viable tactic, and that wouldn't require a lot of ships.  After all, this is a side project and not anything major.  Well, I finally found something that I think will fit the bill:

I know what you're probably thinking: "Cod Wars?  Huh?"  These were a series of disputes between the UK and Iceland over fishing rights in Icelandic waters.  They weren't really a war in the sense that wargamers think of one: there was only one fatality and the naval forces of the two nations never actually shot at each other.  The actions of this set of "wars" consisted of the Icelandic Coast Guard cutting the lines of trawlers in Iceland's territorial waters, and vessels from both sides ramming each other.  Not necessarily ramming to sink another vessel, but more like the traditional 'bumper boats' that the US and USSR played with each other during the Cold War.  Well then, sounds perfect for my needs.
After buying the rules, I was pleasantly surprised (and somewhat relieved) to find that all the miniatures you would need to play a game were available on Shapeways.  I bought what I would need to run the game, and was again pleasantly surprised when they arrived.


L to R: ICGV Baldur, ICGV Tyr, 3 side trawlers, British tug Lloydsman


L to R:  ICGV Odnin, ICGV Aegir, 3 stern trawlers


L to R:  Star Polaris, Star Aquarius, HMS Exmouth, ICGV Ver
Those  three sets provide more than enough ships to run any scenario, and most of the ships needed for a campaign (which is included in the rule book).  This is my first experience with 1/1200 ships printed by Shapeways, and I have to say that I am very impressed with them.  The detail is fantastic, as I hope the closeup below will show:


I will also try and get some extreme closeups before I start painting any of the models.  The fact that the ships are printed in a translucent plastic doesn't help much in seeing the details from a photograph.  To give you an idea of the detailing, the two ships at the top of the photograph (Star Polaris and Star Aquarius) are actually different from each other.  One has slightly larger funnels than the other, AND it also has an extra crane and rubber boat on board. 

You don't even need to label their bases.
As you might guess, I'm very impressed with these.  I'm looking forward to getting them painted and out for a game, just to see what everyone thinks.


Saturday, September 15, 2018

A Death in the Gaming Community


When I got up this morning, I was greeted by an email from Vol Williams.  In that email, he told me that Rory McCreadie had died.  Rory had been fighting cancer for some time.  I hadn't spoken with him recently, but every person handles that fight in their own way and he wanted to be private with his.  Vol did tell me that Rory passed away in his wife's arms, just as he had wanted.

Rory was an enthusiastic naval gamer, but was more than just that.  He was also an expert on the medical side of life at sea, particularly in the earlier part of our genre.  Rory had even written a book on the subject, entitled The Barber Surgeon's Mate of the 16th and 17th Century.  It's here on Amazon: https://www.amazon.co.uk/Barber-Surgeons-Mate-17th-Century/dp/1874351139

More than just being a book writer, Rory also traveled around presenting the barber surgeon's mate to various history and medical groups.  I've looked around the web, and found some pictures of him "in action," so to speak.  I've posted them below, but if there are any objections from the owners I will remove them.


An important thing to know about Rory was that he believed in doing things the right way.  He knew that taking shortcuts in research would only lead to faulty results.  More importantly, he knew those faulty results would be picked up by people later and used to justify their own shortcuts.  This was an area he did not compromise on.  This meant that he could sometimes come across as a bit brusque when he thought someone whose work he respected had fallen short.  In fairness though, he held himself to the same high standards he held others to.

So, until the next sailing ship post, the blog is in mourning.  When a ship is in mourning, her yardarms are arranged cockbilled, like you see in the drawing at the beginning of this post.  I don't know Rory's religious affiliation if any, and would not have asked it of him.  I think, though, that given the era he specialized in, he would know this passage from the 1662 Book of Common Prayer:

WE therefore commit his body to the deep, to be turned into corruption, looking for the resurrection of the body, (when the Sea shall give up her dead,) and the life of the world to come, through our Lord Jesus Christ; who at his coming shall change our vile body, that it may be like his glorious body, according to the mighty working, whereby he is able to subdue all things to himself.
Requiescat in pace 

Thursday, July 12, 2018

PBR Shootout Part 1: Armaments in Miniature

Welcome to the first of some posts that will be naval themed, while moving up in time a little bit.  On the Vietnam page of the blog, I took a look at the 15mm Patrol Boat, River (PBR) models that are available.  On the main page here, I'm going to take a look at the best models available, and I'm starting off with the offering from Armaments in Miniature.

Just as a quick FYI, this post is going to be a little bit different from the others.  Instead of finishing the entire boat and then publishing the post, I'm going to publish it now and add to it as the construction goes on.

Armaments in Miniature (or, AiM) is probably best known for their 15mm aircraft from various eras.  However, while going through their website one day I found this model, and decided that I had to have one.  The boat appears to be made from the same white resin that their other models are made from.  There is the slightest hint of a mold line on the starboard side and rear of the hull, but it is easily shaved away with the back of a knife blade.  For any other company I would be raving about the cleanliness of the hull casting.  As a long time AiM customer though, I find myself simply nodding and going, "Yeah, about right for them."  That's probably unfair to AiM, but they set very high standards for themselves.

For step 1 of the assembly, I did nothing more than take the hull out of the bag, take a few knife swipes to remove the mold line, and then drill a hole in the tub so that I could magnetize it.  The magnets aren't really necessary, but I think they will make the boat travel a little more safely along with adding some 'gamer protection.'

Yes, the hull is that clean, right out of the package.
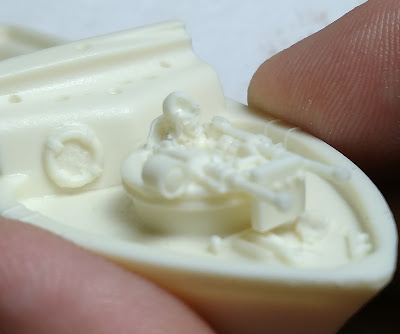
Step 2 is the gun tub, and it consists of three parts.  They are: 1) the gunner, guns and tub, 2) the searchlight, and 3) the gun shield.  I didn't take any pictures of the individual parts, but there is a nice touch here, in that the casting sprue for the searchlight faces down when it is assembled.  So, if you can't cut it completely flush it's not going to show.  This is also the location of the only air bubble I have seen, but I will let the pictures tell that story.

The casting may look rough, but remember the picture is much larger than life size.

So, there's the air bubble.  I appreciate the fact he appears to be wearing goggles or sunglasses.

Yep, he's gonna have a headache all right.
Step 3 is the coxswain's flat, or control center.  As I said before, there's no doubt this is a labor of love model for AiM.  Just look at the details on the control panel.

The right side bulkhead is a separate piece that I've already glued in.
From left to right, there are engine gauges, a compass (it's in the notch next to the gauges), engine throttles and that round thing next to the bulkhead is the radar screen.  I'm going to build and detail this separately, then glue the assembly into the boat.  The photo below, with all the pieces dryfitted together will show why I think that's necessary.

Obviously, a little cramped once it's all together.  But it's very nice!
Turns out there's only so much detail you can add in 1/100 scale.  I put some gloss over the gauges and the compass, but they are so small that it doesn't show up very well.  The bright green thing next to the throttles is the radar screen.  It should probably be black like the gauges, but I wanted a little flash of color in the cockpit.  It too has been gloss coated.


It turns out that this is just the right amount of detail though, because in those cramped quarters:

We're gonna put this guy:

I'm so impressed with the coxswain figure, that I want to show a couple of pictures of him before he's painted.


I had trouble getting my camera to focus on him, but you can still see that he's wearing a beret with badge, and sunglasses.  What you can't see is that he has an open top holster on his right hand side, and that the ribbons from the beret are hanging down the back of his head.  He clearly has on jungle fatigue pants, but you can't really tell what's under his flak jacket.  I originally thought about giving him the traditional chambray Navy shirt, but pictures from the period don't seem to support that.  Once painted up, some more detail pops out and I can see that my skills are declining as I get older.


What's interesting about the figure is something that isn't noticed while you're painting him.  When you put him in the cockpit, you'll see that along with having his hands on the wheel and throttles he is leaned back against the armor behind him.  In other words, he's ready to GO if things suddenly get bad.  That is a very nice touch.


Definitely ready for trouble.
Step 4 deals with the rear .50 cal, along with the rail and cleats.  This is the first place where I did things differently than the instructions suggest.  I wanted the rear  HMG to be able to rotate, just like the forward gun tub.  My first attempt used a metal rod through the bottom of the tripod, and a hole drilled in the deck where the mounting tab would go.  That first attempt looked like this:
The tab on the back is where the gunner will go.
I decided I didn't like that, so went with some small magnets.  How small?  Well, look at the pictures below:

The knife blade is a #11 X-Acto
So yeah, pretty tiny.  The problem with using magnets this tiny in a small spaces is that they almost always wind up going in at an angle.  That's what happened here on both the tripod and the hole in the deck.  No photos of that unfortunately, because I immediately went into problem solving mode.  Rest assured, some nasty words were said.  I finally wound up putting a patch over the magnet in the hull, and building up the bottom of the tripod.
The patch is made of .01 thickness plastic, and is 4 x 4 mm.

Not as clean as I would like, but it works.
It's a Frankenstein looking piece of work to be sure, but the gun does now sit level in the back of the boat.


The gun looks like it might sit a little high, but that's because the stern rail hasn't been glued in place yet.  Yes, the stern rail is a separate piece.  Also, once the gun and gunner are painted and the rail is in place, I will post some action photos.

7/27 update:

Well, my original plan to post photos after the rail and gunner were done didn't quite pan out.  There's some good news and bad news in that regard.  The good news is that I got a burst of work done and finished several steps.  The bad news is that burst came from me screwing up and having to fix it.  

When you look at the pictures below, you will see that there are cleats beneath the rail on the stern.  They're about 5mm long, and AiM provides 4 of them in the kit.  If you're thinking that's the perfect size to lose one without knowing it, you'd be right.  So the boat had to sit and wait for awhile while I found something to try and replace what I'd lost.  After a while, I found these:
Very nice people to deal with by the way.
At this point in my life, I'm smart enough to buy two packages of these cleats.  Why, you ask, when there are 8 of them per bag.  Well, although they're bigger than the kit cleats, they are still pretty small:
Each of those hash marks equals 1 millimeter.
Between dropping them and cutting them up for experiments, I KNEW 8 wouldn't be enough.  First, I tried cutting off the base and fitting them into the holes on the kit, but that didn't work.  Finally, I had to wind up doing some minor surgery on the boat itself
One of the scarier moments in my model building life.
Well, after a bit of worrying they did fit and I trimmed the ends of them so that they would be a bit closer in size to the kit ones.  With that done, I finished the aft gunner.  This is where I discovered my first mistake.

For some reason, my gunner is too short to reach the back of the gun!  If you look closely, you can see that the piece of .01 plastic sheet curves up to reach him.  Given how well-engineered the rest of the model is, I'm going to blame myself for this one.  Maybe the gun was supposed to be more elevated on the mount?  Fortunately though, when the gunner is in place this isn't particularly noticeable.


So the stern gunner can be rotated just like the forward gun tub.  Was it worth the trouble?  Well, I think so but your mileage may vary.  It does look good:


As you can see, the midships pulpit and weapons are in place also.  No real problems with anything there, so honestly not much to talk about.  The two weapons are very nicely detailed, but as I have a new camera none of the pictures I've taken show off that detail.

With all that done, I circled back to step 1 and finished up the forward gun tub.  Since my various methods of trying to patch the air hole didn't work, I bit the bullet and reskinned the helmet using green stuff.  I didn't completely fill the divot, but did manage to do a decent job of covering it up.


Since I didn't get the helmet shape quite right, I decided to paint it gray instead of green.  I've seen some pictures of that, so it's not completely unrealistic.  The rest of the tub (guns, uniform, etc) were painted as per the other figures.


So, that's where she stands right now.  The canopy still has to be assembled and installed, and the various masts and antennae installed before I'm done.  I think you will agree though, she's starting to look more like a warship (and a lot more crowded).


7/28 Update:

The object today was to get the canopy assembled and put into place.  Depending on which of the 3 (!) options you choose, this can range from 0 to 8 parts.  The options are:

A) No canopy or frame whatsoever.  Obviously, that's the 0 parts option.
B) Canopy frame but no cover.  That is the 8 part option.
C) Canopy with cover.  That's 7 parts, counting the searchlight and flagpole that go on top of the cover.

According to the instructions, if you choose the canopy with cover, you have the option of not gluing it to the boat so it can be (carefully) removed.  I decided to do this, but to be honest I don't think the canopy will ever be removed again.  I'll explain that later.

The first picture below is the sprue for the canopy, and the next one has the various parts for the frame circled.

Yes, one of the green parts was removed before I thought to take the photo.
If you want to build just the frame, you will need the green parts (those curve around the front of the superstructure), the red side frames and and the circled blue parts which are the top bows that would support the canvas canopy.  I bet this would look fantastic, but I find it hard to picture a boat crew going without some sort of shade for 12 hours.  Due to that, I decided to go with option C.  The fact that these options are available, however, do show the amount of thought that went into the design of this model.  Options A or B would be excellent for some sort of training or repair diorama.  You can get some idea of what that might look like in the picture below.

You do have to imagine the cross frames in place and the assembly painted green.
At first I thought I would have trouble getting the frames painted, but then came up with an idea for a jig that held them in place.  I decided to continue an experiment I've been doing on this boat by using a silver paint for the primer coat on the frames.  I did this on the stern rail and then installed it before I sealed it.  By doing this, some of the green rubbed off in handling and gave the appearance of a metal rail with paint rubbed away to show the natural finish.  In that same vein, I primered the canopy with a khaki, and painted over it in various shades of green.

OK, maybe "jig" is a little too highfalutin' a term....

The searchlight and flag staff will go on after the canopy is in place.
Unfortunately, once the canopy is in place the beautifully detailed cockpit and coxswain figure pretty much disappear.  Yes, I guess I knew that, but I didn't know it until the canopy was in place.  Nevertheless, I still think it's the most accurate way to go for a boat on patrol.  Fortunately, I left the canopy unglued to the boat as the mounting holes for the side brackets are sufficiently deep to hold it in place.  Given the way those front pieces glue to the side brackets though, I don't think it will come off very often if at all.  Once the radar, mast and antennae are in place, I think it might be even harder to take it on and off without breaking something.  I put the searchlight and flagstaff in place, but did make one minor modification.  As you can see from this photo:


the flagstaff comes with a flag molded to it.  I cut the flag off and used just the flagstaff.  I don't think my skills cover painting a decent looking US flag, and it only took about 25 minutes to whip up a double sided one in a graphics program.  I'll put that in place after the model is finished.

As of right now, the boat looks like this:


With the canopy in place, she really looks like a PBR now!  Just a few more parts, and assembly is finished.  My next update will include the finished boat (although it might not be completely weathered to my satisfaction), and my thoughts about the model.

8/4 update:

The boat has actually been finished for a few days, but I haven't had a chance to sit down and take the finishing photos.  Also, if you've been following along this far, the last couple of steps are really a bit anticlimactic.  For the next to last step, you simply install everything that goes on the front of the cabin.  They are, in order of assembly: 1) the ship's siren [it's labelled "light(?)" in the instructions, but is actually the siren], 2) the mast with navigation lights, 3) the two whip antennas and 4) the radar and mast.  All very simple, as you can see from the picture below:


I did make one change to the model at this point.  Instead of using the two resin whip antennae, I decided to cut two pieces of .025 music wire and use that.  In theory, this will hopefully protect the resin mast and radar from gamer's hands.  In retrospect, I should probably have replaced the radar mast with some of the same stuff.  If you should decide to do the same thing, I would suggest changing the assembly order up and putting the antennae in last.  

The colors for the formation lights are based on the instructions for the Tamiya 1/35 scale PBR model.  From looking at pictures of the real things, it appears that they could be in various orders, so my red/blue/green top to bottom is not necessarily the only way.  The red light on the top of the mast is supposed to be an infra-red distress beacon, so I painted it more of an orange-red color, but the difference is not that noticeable.  All of the mast lights and the two searchlights were hit with a coat of Vallejo gloss varnish.

The last step is to glue the six tires to the sides of the boat.  It's not necessary to use thread for this, as AiM has very helpfully cast lines around the cleats that can be painted, just like the line for the anchor.  When I had to replace the two amidships cleats though, that detail was lost to the knife.  So, I simply tied some of my tan string to the tires, glued them in place and then tied the thread around the cleats.

It's a small detail, but one that really catches the eye.
The front tires are handled a bit differently, since the forward cleats molded to the forward deck.  For those, I ran the lines down the sides of the cleat, glued them in place and then glued another piece of string over the top to give the appearance of being wound around the cleat.

A picture is better than an explanation in this case, I think.
With that, the boat is complete, as you saw in the side view picture.  I haven't put the flag on her yet, but that will only take a couple of minutes.  If my printer can't make a crisp enough one for me, then I will buy a decal from somewhere.  I haven't weathered the boat much, other than some scrapes on the gunnels where the metal would show through and a faded canvas top.  As to what sort of weathering could be done, below is a picture of some real PBRs:


So clearly some fading on the cabin front and darker patches on the hull would not be out of place.  My personal favorite is the self-painted(?) whitewall on the side for a touch of class.  That is definitely something to consider for the next model I build.

Final Thoughts:

Well, my first thought is that I probably should have built this one last, as I'm afraid everything else is going to suffer in comparison to it!  To call it a gaming piece is to sell it short; it is a true 1/100 scale model.  As I said earlier, I am a little worried about the all resin construction, as opposed to the traditional mixture of resin and metal.  The wire antennae that I installed should go a long ways towards protecting the taller resin parts though.  

In short, this is the Cadillac of 15mm PBR models on the market.  It's also the most expensive, at $20 a copy plus shipping as of August 2018.  Is it worth it?  I think so.  Buy this model, and there is no need to do any modifications or add any parts, unless you are building a VERY specific PBR.  The different options for the canopy give the possibility of building  3 different boats without them looking alike, which could be very useful for diorama builders or people who want variety on the game table.  If you're interested in Vietnam-era Brown Water Navy craft, then this is a must have for you.