Tuesday, October 30, 2018

Don't Call It A Comeback....

On October 13, 2018, I led the British squadron to defeat at the Battle of Cape Ortegal during the Texas Broadside! convention held on board the Battleship Texas.  You can see that fiasco at: https://mymodelsailingships.blogspot.com/2018/10/no-scenario-ever-goes-as-planned.html.  On October 28, we had a chance to refight that battle with (mostly) different players at a friend's house.  The result was another convincing victory; but the outcome was completely different.

This time I commanded the French fleet, and one of the French players from the convention was my other player.  There were three British players commanding the four ships.  The starting position was the same as the convention, so I didn't take a picture of that.  The picture below is from the previous game, as the starting position is the same.


What I did try and do was to take a picture at the end of each turn segment to make it easier to see how the battle developed.  I wasn't completely successful, but I did get a few more photographs than normal.  I also now realize that I should probably take a photo and the beginning and the end of the turn segment, because it might make the action easier to follow.  Also, to keep readers from getting too confused later, British ships are in red and French ships are in blue.

Since everyone has played the game at least once, I added some rules in that we don't normally use.  This time, we played with the Gusts & Eddies rule, Signals rules (along with The Line) and Gun Smoke.  So, it was not quite an exact refight of the Texas game, but the additional rules seemed to add a great deal of fun for everyone.  For people not familiar with the Post Captain rules I'll give a quick explanation of each one:

Gusts & Eddies:  Each ship secretly rolls a die (all dice in this game are D12's).  On a 1-2 the ship loses 1 movement point and on 11-12 gains 1 movement point.  This makes it harder to maintain perfect spacing in the line of battle.
Signals:  Captains cannot discuss tactics once the game starts.  To make changes in the plan, the squadron commander must fly a signal and the other ships must be able to read it.  There's more to it than that, but that is the gist.
The Line:  Captains must attempt to maintain the line of battle, although there is a way for Captains to ignore their orders if the situation requires it.
Gun Smoke: Smoke from a broadside remains on the board, and other ships firing through it do so at a penalty.

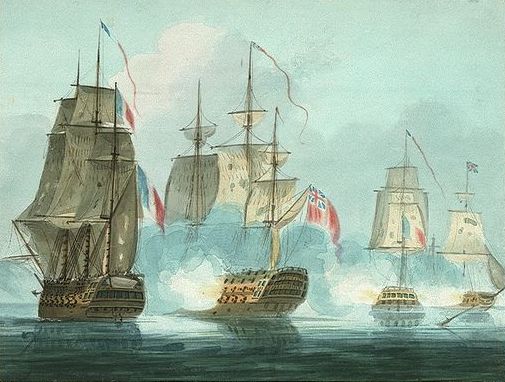
The game started out fairly historically, as the French squadron maintained a line ahead and watched the British come racing down towards them.  At the end of the first phase of turn 1, the situation looked like this:


If it looks like the French squadron has already lost its spacing due to Gusts & Eddies, you would be correct.  HMS Namur is coming up hard under full canvas (she is the rearmost British ship), but has already started taking in sail.  I didn't take a picture of the second phase, but honestly nothing happened other than movement.  The end of the first turn looked like this:

I've tried to crop photos to keep the extraneous junk out, but
it's not entirely possible.
At this point, the two squadrons are not quite within 400 yards, so the British continue to move first as they have the wind gauge.  Once the range is 400 yards or less, we start rolling for initiative. HMS Caesar (the British flagship) has an elite crew, so that will give them a +2 on their initiative rolls.

The British continue their charge towards the French line, and signal flags start to fly on Formidable.  What are those sneaky Frenchmen planning?

That "Gusts & Eddies" rule is doing a number on French spacing.
The British, not so much.
Historically, the French squadron tacked in succession, and tried to move down the British line to concentrate on the isolated Namur.  In this refight Namur has closed up the gap more quickly, and I was afraid of one of the French ships failing a tack attempt and putting the line into disorder.  Also, you can't fire while tacking, so I didn't want to try and have all four ships tack simultaneously; that would give the British several turns of unopposed fire.  The French squadron all passed their check to read my signal, and the result was the picture below.

Turning away from the wolves IS TOO a valid tactic!
I was still thinking about trying to get the squadron to pound on Namur and trying to maybe disengage past the British squadron.  By wearing (bringing the stern of the ship through the wind) instead of tacking, there is no chance of failing a die roll and hanging a ship out to dry.  Historically there were four British frigates on this side of the French that had harassed them before the battle.  We simulated this by deciding that each French ship would take a broadside from one of the frigates, who would then disappear as they played no part in the main engagement.  They were mostly harmless, as expected, but Scipion (the rearmost ship in the photo) did take a crew hit.  The British ships won the initiative and continued their advance, which put them close enough to open fire.  Their shooting was good, and by the end of the turn French plans were starting to unravel.

Gusts & Eddies strike again, as does British roundshot.
HMS Hero (second British ship) and HMS Courageux (third ship) were the first to open fire, and Hero hit hard.  Her broadside brought down Mont Blanc's main topgallant mast.  With that dragging in the water, Mont Blanc couldn't complete her turn and this threw her out of formation as you can see above.

The next turn saw the British continue their run of excellent shooting.  At this point though, the firing became general and the French started to get some licks in too.  The French were shooting high, trying to disable British rigging so they could try and get away.  The British were shooting low, trying to destroy French guns and force morale checks on the French ships.


The damage was all going for the British, but the French now had an advantage that we didn't realize before it happened.  With the French line reversed (except for Mont Blanc, of course), the French movement order was now reversed too.  While the French ships would be moving slower due to heading into the wind, the two lines should shoot past each other fairly quickly.  With a little luck, the French might be able to extract themselves from this.


Such was not to be, though.  You can see Scipion at the top of the photo making a getaway (albeit with 30% hull damage), but the rest of the French squadron is truly stuck in.


After this phase, we decided to call the game.  In this phase, Mont Blanc lost her entire mizzenmast over the side and got her Captain killed.  Formidable lost her fore topgallant mast by failing a rigging check.  She also had her wheel shot away, which meant a possible collision with Namur sometime next turn.  The Captain of Namur was salivating at the possibility of a bow rake and a boarding action to boot.  Caesar had overshot the battle because she couldn't turn sharply enough and reload at the same time.  While we were running short on time, no British ships were damaged enough to require a command check, whereas three of the four French ships would have to take them.  To make it worse, Mont Blanc's 1st Lieutenant was nowhere near the leader her Captain was, being rated as Green instead of Regular when he took command.  That would make it even harder to pass the command checks that would be coming up.  British damage was negligible, and Hero was completely undamaged.  Undoubtedly, this was a British victory.

 What does this say for the Post Captain rules, that the same scenario can get such different results?  Personally, I think it completely vindicates the system.  In the game on the Texas, the French handled their ships more historically than the British and they won.  In this game, both sides handled their ships well, but the British won a definite victory.  The same scenario, played twice, gave an expected result (this game), while allowing the possibility of something completely unexpected (the Texas game).  To me, that means the game is well designed.

We probably won't get any more games in before the end of the year, but I think our next one will be some sort of large frigate action.  That way, the players don't have to concentrate on maintaining the line and can concentrate on just pounding each other.

Sunday, October 28, 2018

How Do You Say "Unicorn" in Russian?

Today's unicorn comes to us courtesy of the Russian Navy.  In all honesty though, she's not so much a unicorn as she is an odd duck.  I nicknamed my unfinished ships "unicorns" though, so we're sticking with that.

When I first bought this miniature, it was listed as "50 gun (2 deck)," which led me to think it was a ship of the line, just like a British 50.  Some time later, I purchased the book Russian Warships in the Age of Sail 1696-1860 by John Tredrea and Eduard Sozaev.

I've said it here before, but it bears repeating: this is
THE English language work on the Russian sailing navy. 
Not only is this an excellent reference work, but it reminds us that nations do things according to their own logic, whether it makes sense to us or not.  This 50-gun two-decker is an excellent case in point.  To us, it's a small ship of the line, like the famous/infamous HMS Leopard.  To the Russians, it's a frigate.  "Oh, OK" I hear you saying. "So she's just an old two-deck frigate like HMS Serapis."  Problem is, it's just not that simple.

According to Tredrea and Sovaev, these two deck 50+ gun frigates  were a series of one-off designs (unlike the Pyotr Apostol class of 46-gun ships) that were designed for operations in the Black Sea.  Referred to as "battle frigates" or "frigates of the line," the idea was that they could perform the functions of a frigate and then reinforce the line of battle once the engagement started.  You can see this from the armament carried.  Whereas Serapis carried 18 pounders on the lower deck and 9 or 12 pound guns on the upper, these Russian ships tended to be armed with 24 to 36 pounders on the lower deck, and anything from 12 to 36 pounders on the upper deck.  A "frigate of the line" indeed!  To use a more modern analogy: If the USS Constitution and her sister frigates were like a WWI battlecruiser, then these Russian frigates are more like a WWII pocket battleship.

With that bit of design history aside, below are some pictures of my finished model.  After looking at those, I'll talk about some of the issues with this particular mini.


 At first glance, you'd certainly think that he (the Russians call ships "he," not "she") looks like a small ship of the line.  Looking at pictures of this 50 gun frigate together with a 66 gun ship of the line might make you wonder even more about this ship.  So, here we go.

The 66 gunner is on the right of the photo.

The 66 gunner is only about 12 feet longer on the waterline.  What gives?
Interestingly enough, this resemblance to a ship of the line is the best clue as to what ship this mini represents.  As I said before, all of the 50+ gun two-deck frigates were one-off designs, so it can't represent all of them.  So, the "typical" large frigate of the Black Sea Fleet might have looked something like the drawing below:

This is Grigorii Velikiia Armenii [Gregory the Great of Armenia], a 50 gun frigate built in 1791.  He carried 28 30 pounders on the lower deck, and 22 18 pounders on her upper deck.  Note though, that he doesn't have 2 complete gun decks like the miniature.  So what ship was the miniature modeled on?

Personally, I think the miniature represents Krepkii [Strong], a 54 gun frigate built in 1801.  He carried 30 36 pounders on the lower deck and possibly 32 36 pound carronades on the upper deck (Tredrea says the carronades are conjectural).  There are no drawings or pictures of him, but Krepkii is listed as "a sister to the Baltic fleet line of battle ship Skoryi [Fast] (62)."  On Skoryi, the upper deck armament is confirmed as 36 pound carronades, so that does seem reasonable for Krepkii as well.

If I wanted to be uber-picky, then I would go on about some problems with the Langton miniature; however, I'm not going to do that.  Quite frankly, Russian Age of Sail ships are damned hard to come by.  Langton makes 6: a 100, a 74, a 66, this 50, a 44/46 two decker frigate, and a 32 gun frigate.  Red Eagle (formerly Skytrex) make a 100, 74 and a 36.  Navwar makes a 66.  It would appear then, that Russian ships are probably not big sellers.  So, rather than nitpicking, I think it's probably better to be happy with the choices we have.  Besides, the more I look through the book, the more I am convinced that the Langtons designed the 44/46 gun frigate miniature so that it could also do duty as the single gun deck 50s.  I will explain that a little more when I finish building my 44/46 gun mini:  AKA, the third unicorn.

Oh, and the answer to the question in the title?  The word "unicorn" in Russian is единорог, and is pronounced ye-dino-rog.

UPDATE: December 6, 2019.  These ships came up on a recent thread at The Miniatures Page.  A person named NotNelson1 was looking for information about the miniatures, so I pointed him here.  After reading the blog post, he asked me if I had asked the Langtons about what ships these were.  I had not. 😞  He did, and they told him that the 50 and 46 gun frigates were not based on any specific class of ships, but were representative examples.  So there you have it; all my speculation above is just that.  The Langtons did say that my estimations were as good as any, so I guess I've got that going for me. 😌  If anyone is interested, here's a link to that thread at TMP:


Sunday, October 21, 2018

No Scenario Ever Goes as Planned

On October 13, 2018 I took the ships out to the Texas Broadside! convention and ran the Battle of Cape Ortegal scenario that I mentioned in the post about HMS Caesar.  As an aside, Broadside is a convention held aboard the former USS Texas, the world's only surviving WWI era super dreadnought.  She served with the Grand Fleet in WWI, and was at D-Day, Cherbourg, Iwo Jima and Okinawa in WWII.  All the money we raise goes to help preserve her, and this was our eighth year to do so.  If you're ever in the Houston area, you should pay her a visit.  Her official website is: https://tpwd.texas.gov/state-parks/battleship-texas and there are plenty of other unofficial tributes on the Internet.

So, with a carefully designed, historically accurate scenario and a group of historical gamers, we should have a refight of the historical event and the overwhelming probability of a British victory.  Because, after all, it's Napoleonic Age of Sail, right?  Well, go back and read the title of this post again.  It's OK; I'll wait.

The scenario starts out looking like the picture below:

The French are in line ahead at the bottom of the photo and the British are bearing down on them.  I had two players, both of whom wanted to play French, so I took the British squadron.

The starting range between the two forces is 800 yards, or 24 inches. In Post Captain, ground scale is the same as the scale of the miniatures you're using.  I explained the situation, and how the French players could achieve a victory.  Basically, if they could get a British ship to fail a command check, then they could earn a draw.  If they could get a British ship to strike, they would win regardless of what happened to them.  I also told them about the frigates that had harassed them before the battle.  What this meant was that if they turned left, then each ship would get a single broadside from 12 or 18 pound guns. The French commander's response was, "We're not worried about that."

At the end of the first turn, I saw why he wasn't worried.
The French had decided to turn as close to the wind as they could, and bear down on the British.  Well then, this was going to be fun!  I was ignoring the fact that my line was nowhere near as neat as theirs, which you can see in the above photo and the one below:
Namur is trying mightily to close the gap.
The two groups continued to close on each other, and both leading ships opened fire on each other at a little over 100 yards.  Unfortunately, I lost the initiative die roll after that, and a French 74 parked itself almost directly in front of HMS Caesar.  I put the helm hard over, but still managed to foul the Dugay-Trouin.  Fortunately though, I did manage to avoid breaking Caesar's bowsprit in the fouling.

"Damn Frenchmen who don't watch where they're going!"
"Damn Englishmen who drive on the wrong side of the road!"
From this point things started to fall apart for the British, although it wasn't apparent at the time.  HMS Hero tried to avoid the mess, and turned towards the French so as to try and provide some support for CaesarHMS Courageaux wasn't so courageous, and turned away from the action to try and clear everything.  What I didn't do was think two or three moves ahead, AND didn't consider what the French would do.  Hero wound up colliding with the French flagship Formidable (yes, they fouled as well), and it cost Hero her bowsprit, four rigging boxes and a sprung foremast.  At the end of the turn, the two lead ships were organizing boarding parties for next turn, and the two lines now looked more like the picture below:
So that went pear-shaped pretty quickly....  Namur is still far from the fight.
While the two pairs of fouled ships tried to separate themselves, the marines on all those ships were firing away at each other.  Crewman and marines were falling on both sides, and then came what I think was the most important shot of the game.  During the firefight between the marines of Formidable and Hero, the Hero's captain was killed.  This meant a command check would be taken at the end of the turn, and the ship could only move straight next turn.  While the ship passed her command check with ease, the straight only movement would wind up dooming the British.

My picture taking had gotten pretty sporadic by this point, so there aren't a lot of "in action" photos of this part of the game.  Caesar had cut free of Dugay Trouin but fouled again trying to get past her. (I lost that initiative roll even with a +2 advantage.  My rolling was so bad I threatened to line the dice up and smash one with a hammer. 😡)

Formidable didn't want to keep Hero around and so didn't try to grapple her.  Hero  repaid Formidable with a broadside and started to move away.  Before Hero could get too far away, Mont Blanc moved up and fired into both Hero AND Formidable in an attempt to give some more rigging damage to the British ship.
The last good moment for the British
While Mont Blanc damaged her comrade as well, by the end of the turn Hero had no rigging boxes left.  The die roll for this was bad enough that a mast fell, and it was the main topmast.  The foremast, which was sprung due to losing the bowsprit was still standing, but I couldn't be sure for how long.  Hero now had just two movement points left, and the wrecked maintopmast hanging over the side meant that she would lose two movement points until it was cut away.  So, she's dead in the water with Scipion bearing down to deliver another initial broadside at close range.  We were starting to run short on time, and the general consensus was that the British had managed to work themselves into a defeat.  Everyone involved had a good time though (myself included), so that's what was important.

Since I'm kind of short on actual gameplay photos, I've also included some generic ship porn photos from the beginning of the game.


I'm running this same scenario next Sunday, so we'll see what happens then and write up another report!

Monday, October 1, 2018

Hail Caesar!

Once of the nice things about having a large collection of ships is that you can occasionally buy something for a specific scenario.  This post is about one of those specialty ships.

One of the scenarios that I like to run at conventions is the Battle of Cape Ortegal (https://en.wikipedia.org/wiki/Battle_of_Cape_Ortegal).  If you leave out the British frigates, it's a nice 4 ships per side game, and can be pretty straightforward where victory conditions are concerned.  The ships are also pretty straightforward; 1 British 80 and 3 74's versus 1 French 80 and 3 74's.  What makes the scenario unique is that the British 80-gunner isn't a French prize, as one might expect.  Instead, she is a one-off design known as HMS Caesar.

Launched in 1793, Caesar was about as big as you could build a wooden warship at the time.  She measured 181 feet on the gundeck, compared to 168 feet for a Common class 74 gun ship of the line.  At Caesar's size, designers had to worry about the hull deforming due to the mere length of the vessel, even without the added weight of armaments.  USS Constitution is almost as long, at 175 feet on the gundeck.  Her designer, Joshua Humphreys, included diagonal braces called "riders" inside the hull that help prevent the hull from distorting.

Overall, Caesar's career was active but not particularly spectacular.  She was ordered in 1783, laid down in 1786, and launched in 1793.  She saw combat in 1794, 1801, 1805 and 1809 before being being converted to a depot ship in 1814 and finally broken up in 1821.  While she seems young to be taken out of service (21 years) compared to others (HMS Victory was already 28 years old when Caesar was launched), the numbers are a little misleading.  Caesar spent only two years out of service during her lifetime (1803-1805) whereas Victory was laid up several times (1765-1778, 1787-1792, 1799-1803, 1806-1808, 1813-1823) .  It's not exactly a fair comparison, as First Rates like Victory was expected to be taken out of service when the need for them wasn't pressing.  Still, even if you don't count anything before 1799, Victory spent about half of Caesar's active life in ordinary.

Given that she was active pretty continuously during the Napoleonic Wars, you'd think that there would be lots of paintings of her.  You'd also be wrong.  In searching for pictures to use as a painting guide, I found exactly two.  They are:
Listed as "Caesar engaging Mont Blanc"

"Strachan's Action After Trafalgar, Bringing Home the Prizes, HMS Caesar"


 Frankly, I don't think the top one is very helpful.  In the second one, the prize looks a lot like a three-decker and there weren't any of those at the engagement.  It does provide a good view of a British warship though, and the damage does correspond to what was reported for Caesar, which means that I am probably wrong on identifying the French ship.  So, I decided to go with this one.  Below are the pictures of my completed model.


Since there hasn't been a shot on here with the Quarter of Comparison in a while, I've also included one of those below.


To try and give you an idea of how much larger this ship is than other third rates, I've put some pictures of her with other British 74 gun ships of the line.  The first one has a British 74 Common class compared to Caesar.


74 Common on the left, Caesar on the right.  The difference between the white marks
is about 20-25 scale feet.
Next, a 74 Large class is compared to Caesar, and comes up short, albeit not as much.

74 Large on the left.  Remember that 1 millimeter in this scale is 4 feet.  That makes the difference
about 8 scale feet.  Not as short as the 74 Common, but still shorter than Caesar.
Finally, here's a shot of all three ships together.

L to R:  74 Common, 74 Large, HMS Caesar.
Just to be clear, the base is the same size (40 mm wide by 75 mm long) for all three ships.  Obviously, there's some variation as to just where I glue the ships on the bases!  That's why they are lined up by the blue lines on the stern.  The white lines mark where the ship's bow enters the water.