Wednesday, November 29, 2017

What Is My Time Worth, Part 5: Standing Rigging

So with the masts in place, it's time to start doing the rigging.  This is the area where most gamers start saying things like, "Oh, I can't do that."  Truth be told, looking at a finished model without seeing how it was done can be a little intimidating.  There are, however, several guides available to the modeler that will walk them through the process.  Some of them are online, and a good one is at my buddy Vol's blog: http://volsminiatures.blogspot.com/ .  Look for "Rory's rigging guide", as it is in several entries, and some can be purchased.  Personally, I use Rod Langton's guide, which is pictured below:


They now cost $22 from Waterloo Miniatures here in the US,
but to me it's been worth every penny.

I will try to follow the rigging instructions step by step, as they are outlined in the manual.  That is probably the quickest way to see how we go from this:

Nice enough, but naked.
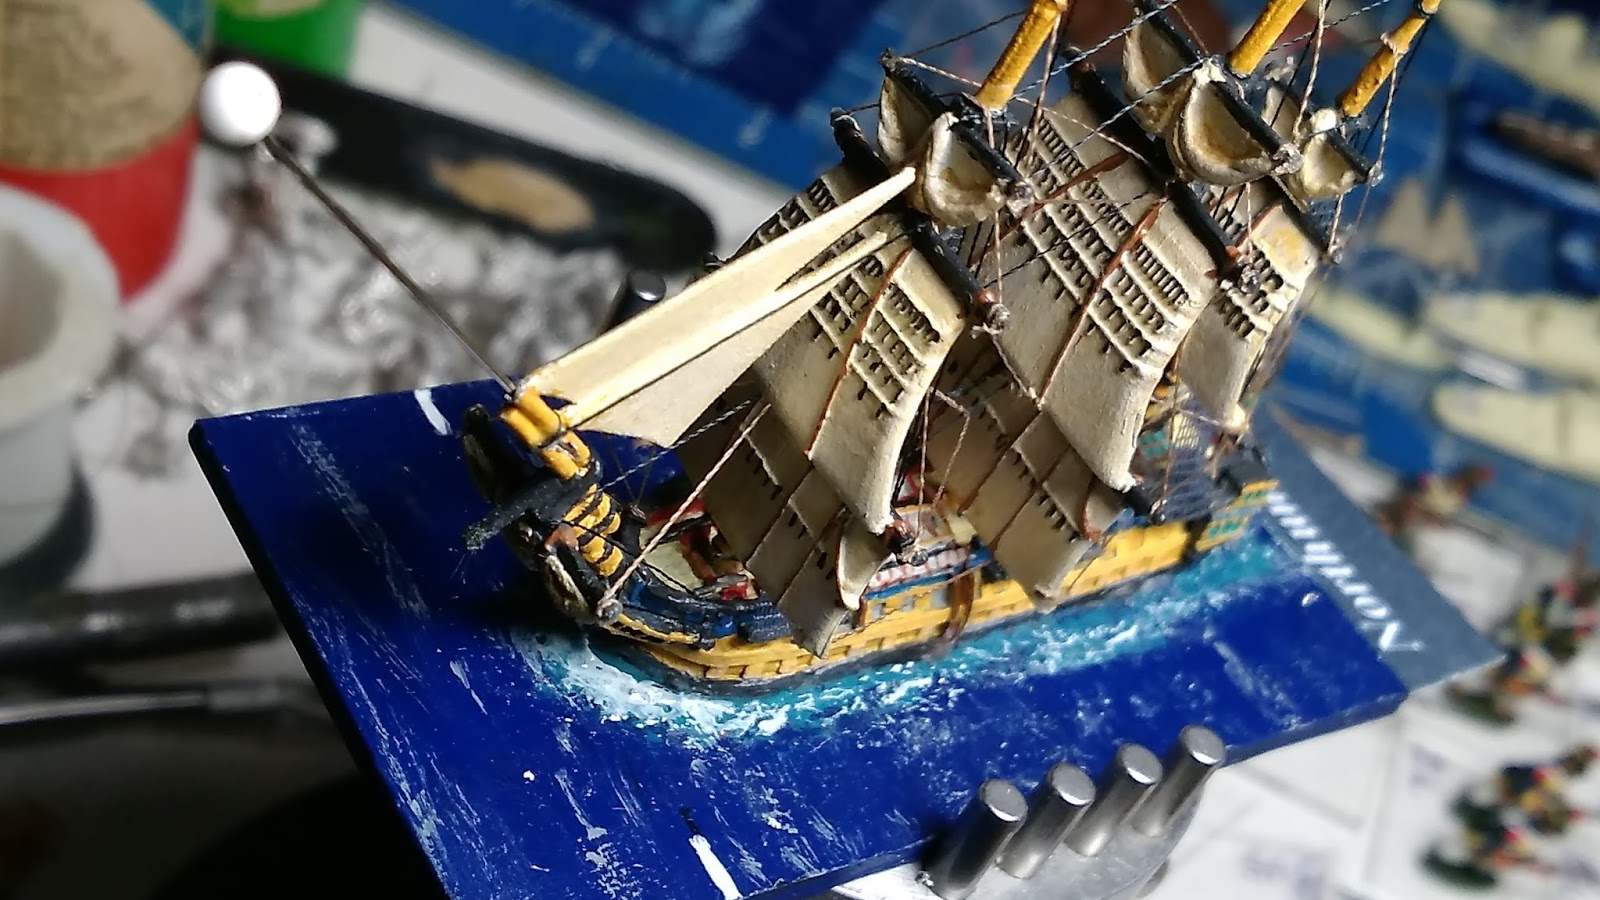
to this:
Now, she is starting to look like a sailing ship.


The first step is drilling the holes that will let us run the rigging.  Normally I would do this before the hull was painted, but decided to wait on this ship so that all the steps would be in a logical order.  If  you do this, you will have to touch up paint on the hull and possibly the deck when the drill bit goes through and scratches your work.  The picture below is from the rigging guide, and shows where the holes need to be:


Holes A, B and C are each .5 millimeters with hole D being .7 millimeters, but I drill A with a .7 millimeter drill bit as well.  That's because there will also be running rigging going through that hole.  You'll also see a handwritten note about an extra hole near the bow.  That's so the bowsprit can be rigged.  It's mentioned in the book, but not shown on the reference sheet.  There is also a .7 millimeter hole at E, which I should have mentioned in Part 4 but apparently didn't.  To give you an idea of how small these drill bits are, here's a picture of them:

.5mm on left, .7mm center.  The big one on the right is 1/16 of an inch.
I get my small bits from Micromark. https://www.micromark.com/


  1. Here, we drill the holes at A, B, C and the one I have written in.
  2. Next comes the .7mm hole at D.  The manual also says to drill the hole at E here, but I do that before the masts are installed.To drill the nine holes in the hull took me about 23 minutes, including touching up the paint where needed.  Next comes the stays, or the lines that run between the masts.
  3. This runs from the bowsprit, around the left side of the foremast, over the main yardarm and through the hole drilled there earlier.  In the photos below, it's highlighted in orange and took 23 minutes to complete.  
  4. This line runs from the foremast, over the main yardarm and through the hole where it's tied to the larger string.  It's highlighted in bright green. 
  5. The gammoning of the bowsprit comes next, and it's done in purple.  This helps hold the bowsprit in place on the real ship, and does the same thing here by keeping it from bending up.  It's hard to see in the photo, but it's done in a figure 8 shape that also runs lines out to the spritsail yard.
  6. After all that, the next line is pretty simple.  It runs from the mainmast over the crojack yard and secures the mizzenmast.  You'll see it in bright yellow.  Steps 4-6 took 44 minutes total.
  7. Finally (for these threads) is what the manual calls "a long length of thread and it finishes off the lower stays.   It runs all over the ship, and you'll see it highlighted in pale blue.  It took 27 minutes to install.  The total for standing rigging to this point: 106 minutes, or 1.76 hours.
Highlighted lines are explained above.
Next up are the ratlines, and this is where I do things a bit differently from the Langton manual.  When it was written, When my copy was written, there were no photo-etched brass ratlines, with a mesh being used instead.  The manual recommends those mesh ones be put in after all the standing rigging is in place.  I find that's too hard to do with the brass ones, so I install them before I install the backstays.  They come in unpainted brass (as seen below), and I simply spray paint them black and then seal them with a spray of dullcoat.  After that's done, I cut them from the sprue, touch them up with a black Sharpie, and install them.  It's never an exact fit; you have to cut some off of the top to ensure that the bottom sits on the channels like they're supposed to.  It took 28 minutes to install the six lower ratlines, and 17 minutes to install the six upper ones.  It takes less than 5 minutes to paint and seal them, so I called it 3 to make this step an even 48 minutes.

I'm pretty sure this picture is larger than life-size.
After this is done, it's now time to do the backstays and remaining stays.  The manual says to start from the mizzenmast and work your way forward.  This makes senses, because it gives you more free space to work in.  You take another "long length of thread," and run it up and down the mast three times to give you the backstays.  After you tie that off to the mast, you use the remainder to make the other stays running towards the bowsprit.  I've tried to use different colors to show how the lines go up and down, but may not have been too successful.  Anyway, the times for each mast are:

      8.   Mizzenmast: 35 minutes
      9.   Mainmast:    28 minutes
      10. Foremast:     25 minutes

Lines from earlier steps have been erased (although not very well).

And that gives us a total of 88 minutes for the backstays.  Now, we're almost done with the standing rigging, with all that's left to do being rig the bowsprit.  Rather than take another picture of the ship and having to erase more lines, I'm going to be lazy and use a view from the manual.  


   11.  This is one line, tied in the center at X, then run in numerical order (number 2 are the holes we drilled back in step one) and tied off under the bowsprit at 3.  Time for finishing this line was 19 minutes. 

Total time for doing all of the standing rigging was 261 minutes, which works out to 4.35 hours.  When combined with the other times I've recorded so far, this gives us a total of 11 hours and 28 minutes, which we can round to 11 1/2 hours.  In the next "What Is My Time Worth" post, I will do the running rigging and bring this project to an end.


Tuesday, November 28, 2017

Refitting and Repairs

One of the things AOS gamers have to realize is that, if we take our ships out and let people play with them, they are going to get damaged.  I should emphasize at the beginning that this is not something they are doing on purpose.  (OK, that one guy joked about it one time, but it was probably a joke even if I didn't take it that way. Besides, that is a story for another time.)  Instead, it's just the nature of the beast: our 1/1200 scale models are more fragile than regular miniature soldiers.

It used to bother me more than it does now.  What changed my attitude, you might ask? The simple answer is: research.  We like to think of sailing ships as machines that could go around the world, only stopping to resupply the crew and that is partially true.  What else is true is that the real-life ships required maintenance on a pretty regular basis beyond what the crew could provide.  Without getting into too much detail, repairs could range from a "refit," which meant only working on the rigging, to a "great repair" which could go so far as taking a ship apart and lengthening it as was done with the 98-gun Prince.  Even without these, a ship could expect to visit a dockyard about once every two years just to replace copper plates along the bottom.  So, with that in mind we probably shouldn't complain about a little repair work now and again.

The two candidates for a refit after Millenniumcon were Cassard and Northumberland; not coincidentally I suspect, those two also saw the most use over the weekend.  The repair on Cassard was the simplest, with a single line on the bowsprit broken.  I didn't take any pictures of the repair because, to be honest, there wasn't any need.  Cut away the broken line, glue another one in its place and that's that.  If you've built any model sailing ships, you could do this repair.

Northumberland had a bit bigger problem, although in the same neighborhood.  Somehow, the last 3-4 millimeters of the bowsprit managed to get broken off, even though it was still glued to the rigging.

How did this happen, you ask? I have no idea, so I'm blaming the
little lead Captain for following too close.
At first I thought I could take the easy way and just glue everything back together.    Of course, I should have known better and that didn't work.  So, out came the little drill bits, and I bored the usual hole in the end of the bowsprit.  After that, I fitted a straight pin into the hole to make sure it would fit.

Have you thought about leaving it like this, you ask?
Yes, yes I have.
Then, I measured the pin and cut it to roughly the right length with some snips.  After gluing it in place, I cut it a bit closer to the correct length and cut away some of the rigging that would need to be replaced.  That happened because I couldn't hold the old rigging in place and fit the pin, and the rigging wouldn't stretch enough to go over the new piece.  Also, the old rigging would not be as taut as I like.

Not looking too great here, but...

Slap a little paint on it, and it's not too bad.
After that, it's just a case of re-running the lines I had to cut away, and she's finished.

Ready to rejoin the fleet!
If there's a moral to this post, I guess that it's don't be afraid to let your toys out into the wild.  If you had the patience to build them, you can definitely repair them.  To revamp/slaughter an old adage:

"Your miniature ships in storage are safe,
 but that's not what your miniature ships are for."

Sunday, November 19, 2017

A Brief Interlude 3: A New(ish) Portrait of Nelson

According to Smithsonian.com, a portrait of Lord Nelson has recently been rediscovered.  What's significant is that this 1799 portrait by an Italian artist shows Nelson's wound from the Nile, instead of ignoring it.  Apparently this painting had the 19th Century equivalent of airbrushing done to the wound at one point, but during restoration that paint was removed.  While you can't tell that his arm has been amputated, the picture is a far cry from the usual Nelson portraits.  The Smithsonian.com article is here:
https://www.smithsonianmag.com/smart-news/new-portrait-lord-nelson-found-scars-and-all-180967205/

EDIT:  Originally, there was not a direct way to show the photo on here, so I provided some links.  Well, as of 12/4 the picture is apparently available online.  So, here it is:


This picture is of a man who is tired, and hurt.  It's certainly an antidote to the usual view we have of him.

Friday, November 17, 2017

Post Captain at Millenniumcon in Austin


On November 10 and 11, I took the ships and Post Captain rules to MillenniumCon in Austin.  While there, I ran two games using the rules, one with only a single ship per side, and a scenario with 10 ships and 8 players in total.  Although I took more photos of the second game, both games were quite interesting albeit for different reasons.

In the first game, I simply pitted a British 74 Large (HMS Northumberland) against a French 74 (Cassard, of the Cassard/Temeraire class).  The two players very quickly understood the rules, and both played their ships as one might expect.  The French player had the wind gauge, and at first stayed outside the 400-yard range so he could move first.  He would duck inside 400 yards to fire during one impulse of the turn, and then move out again in the next impulse.  He kept firing high and getting rigging hits, but the British player was lucky, and kept repairing them.  The British player fired low, and kept chewing away at the Cassard’s guns and hull.  He did get a critical that destroyed the pumps, but the French player wasn’t yet concerned about that damage.   Finally though, the Frenchman managed to get a critical that broke the Northumberland’s fore topyard and that gave Cassard a slight speed advantage.  Now, the Cassard started closing the range to utilize her advantage.  As she approached the Englishman at an angle, it was clear that she was going to use her speed advantage to pull ahead.  Then, once she had the initiative she would turn and deliver a bow rake on Northumberland.   Instead, the British player got a critical hit with his starboard boardside and shot away Cassard’s wheel.  With the Frenchman forced to go straight, Northumberland could turn and deliver a devastating (6 hits, 12 damage rolls) stern rake at about 50 yards with the previously unengaged larboard broadside.  When the smoke cleared, Cassard had the following damage, including what was inflicted in previous turns:
  1. Captain dead,
  2. 4 Crew hits and 3 Marine hits,
  3. 5 Rigging hits,
  4. Mizzen topgallant mast fallen,
  5. Main topgallant mast sprung,
  6. 7 Gun box hits (out of 26 total),
  7. 5 Hull hits,
  8.  Pumps out,
  9. Wheel smashed and
  10. One boat smashed.
At this point, the French player agreed to strike his colors.  By contrast, Northumberland had taken only:
  1. 2 crew hits and 1 Marine hit,
  2. 1 Gun box hit,
  3.  2 boats smashed and
  4.  Fore topsail yard broken
There were also 3 Rigging hits, but they were repaired during the battle.  Both players said that they enjoyed the game.  More importantly, I overheard the losing player describing the game to his friends afterwards and he was both enthusiastic about it and very complimentary.

On Saturday, I ran a scenario entitled “Imperial Issues” that dealt with a ‘what-if’ scenario off the island of Tortola in 1806.  In the scenario, a French squadron of 6 ships attacks a British squadron of 4 ships, attempting to drive them away so that the French can attack the Jamaica Convoy that is set to arrive soon, albeit after the game itself.  While the French squadron has more ships, they are hobbled by the fact that they have been at sea for 6 months and are low on supplies to repair their ships.  So, if any of them lose a mast (defined here as at least a topmast) they must withdraw.  Also, the captain of one of the ships is Jerome Bonaparte and if he is captured or killed the French cannot win.   Unfortunately for the French Admiral, Jerome has a different set of victory conditions and does not have to obey any orders from his superior.  For the British, Antigua is only a couple of days away so they are not worried about ship damage.  However, this squadron is also the convoy escort and there are no other ships available.  Consequently, if any of their ships are heavily damaged or disabled, they must withdraw and thereby lose the scenario.

The picture below shows the beginning of the scenario.  The wind is from the South (left side of the photo), so the French have the wind gauge and the British are pointing.


The North edge of the map are rocky areas off the island, and anyone exiting that edge will run aground.  The other edges are sea room.

The French ships came on in a mad rush, and as soon as the leading ship was within 400 yards, turned to bring her guns to bear.  


The shooting started right after this picture was taken, and for some reason both sides decided to shoot high throughout the game.  There wasn’t much damage being done at the longer ranges though, and so the French fleet closed in again while the British continued in their line ahead.  

The French didn’t have everything their own way though, as the British fired broadsides right into the teeth of their oncoming enemies.


This didn’t stop the French from getting so close that Veteran sideswiped and fouled Northumberland, locking both ships together and breaking Northumberland’s bowsprit.  Because everyone kept firing high, now the rigging damage was starting to pile up.

Since the French attacked without first forming a line, this left all their captains free to pick their targets as they saw fit.  One of the French ships had even hoisted more sail and was working his way to the far side of the British squadron to double it.  Seeing that the British rear was in danger of being overwhelmed, the two leading British ships (Canada and Elephant) decided to tack and come back down to assist their comrades.  Unfortunately, Canada went into irons while Elephant was successful and started to come back towards the battle.


Canada drifted onto the other tack and started back toward the battle, but by then time was almost up.  We decided to play through the blue phase of the turn we were in, and then roll for rigging checks and everything else.  After that, I would determine the winner.  Now this is where things got interesting! 
 
Northumberland was the most heavily damaged British ship, as she had NO rigging boxes left.  That sent the mizzen topgallant mast over the side.  She also had a broken bowsprit, and almost every yard was shattered thanks to a combination of critical hits and the sideswipe with Veteran.  She was, however, still capable of fighting as she had only 2 gun and 2 hull hits along with some other insignificant damage.  Agamemnon lost her upper top and topgallant sails, 2 hull and 6 rigging boxes but still had all her guns.  Elephant lost 3 light and one medium gun boxes and 4 rigging boxes but was otherwise intact.  Canada lost her fore topgallant sail, 4 rigging and 1 medium gun boxes, but were otherwise undamaged.


While the above sounds pretty bad for the British, the French were truly not much better off.  While Eole was completely undamaged and Foudroyant had lost her mizzen topgallant, the other ships were pretty beat up.  Cassard had a sprung mizzen topmast and was missing 8 rigging boxes, Veteran had only 5 rigging boxes damaged, but also had a sprung foremast along with some other damage.  Impetueux also had 5 rigging boxes damaged, along with a heavy gun.  Patriote, however, was in serious trouble.  She had 8 rigging boxes missing and that sprung her mizzen topgallant.  Unfortunately for her, the wheel had been smashed and she was heading towards the edge of the board that would cause her to run aground on the rocks if the wheel was not repaired.  So, while I called the scenario a draw at that point, had it gone on for another turn or two, Patriote would have hit the rocks (unless she repaired her wheel, of course, which I don’t think she would have had time to do).  That would have required the French to withdraw, and thereby give the victory to the British.
 

As an aside, how eager were the French captains to engage their British counterpoints?  Well, this eager:
Patriote fires on both the British flagship Northumberland (right side),
AND her comrade Veteran